Customising Virtual Machine Provisioning
In The VM Provision State Machine we saw how the VM provision state machine was designed to be customisable. In this chapter we’ll go through the steps involved in copying and extending the state machine to add a second hard disk to the virtual machine. This is a simple example, but a typical real-world requirement.
Scenario
We are using an RHEV 3.6 provider with our ManageIQ installation, and we can successfully provision virtual machines using Native Clone provision type from fully configured RHEV templates. The templates all have a single 30GB thin-provisioned hard drive.
|
Note
|
This chapter makes API calls to the RHEV manager using the RHEV 3.x API payload syntax. This has changed slightly with RHV 4.x, and these examples do not work correctly with RHV 4.x. Some RHV 4.x compatible scripts for CloudForms 4.5 & 4.6 are provided here |
Task
We would like all virtual machines provisioned from these templates to have a second 30GB hard drive added automatically during provisioning. The second drive should be created in the same RHEV storage domain as the first drive, (i.e. not hard coded to a storage domain).
Methodology
Edit the VMProvision_VM state machine to add two new states to perform the task. We’ll add the second disk using the RHEV RESTful API, using credentials stored for the provider. We can achieve this in a series of steps.
Step 1. Extend the State Machine
We’re going to extend the VM provisioning state machine by adding states, but we cannot do this to the state machine in the locked ManageIQ domain.
Copy the State Machine
The first thing that we must do is copy the ManageIQ/Infrastructure/VM/Provisioning/StateMachines/VMProvision_VM/Provision VM from Template (template) state machine instance into our own ACME domain so that we can edit the schema.
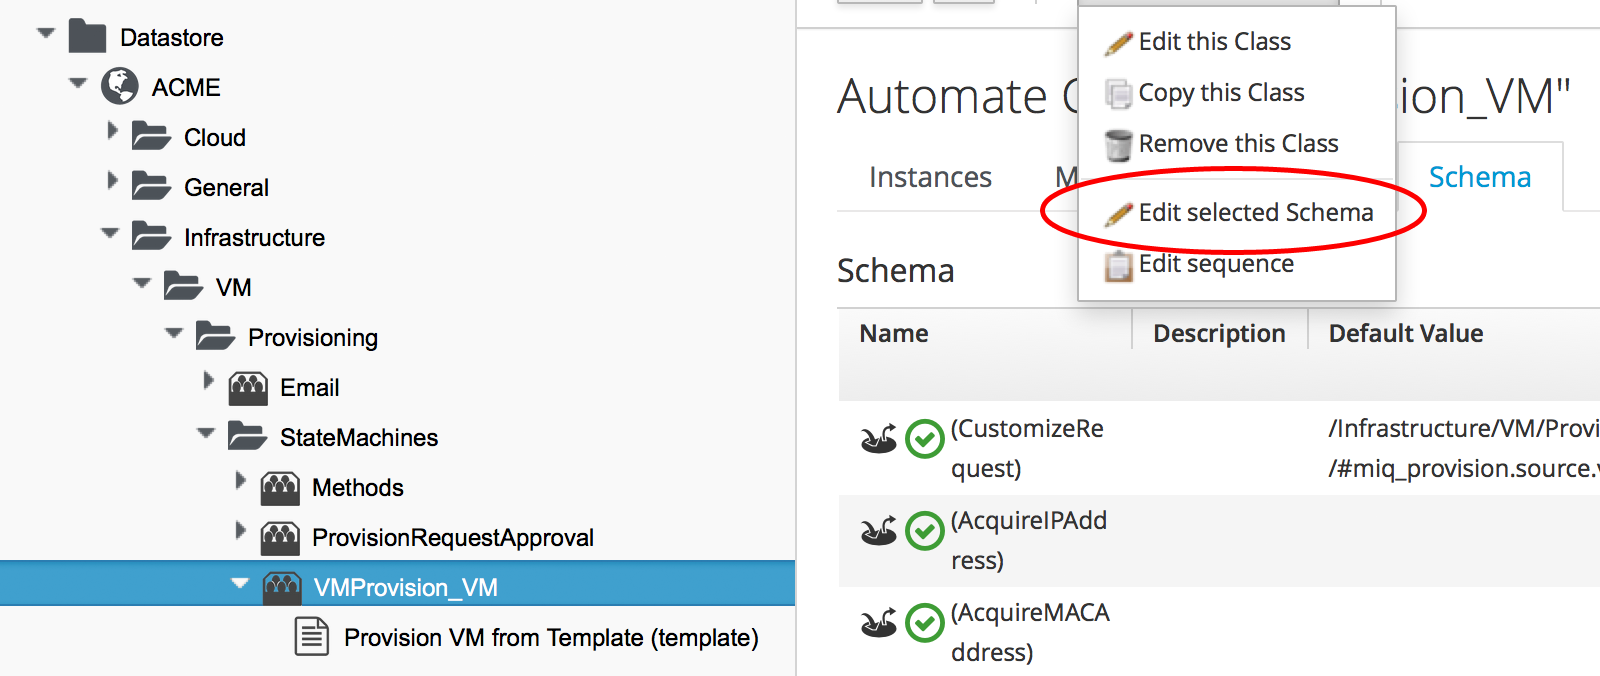
Edit the schema
Now we edit the schema of the copied class (see Editing the schema of the copied class).
Figure 1. Editing the schema of the copied class
Add the new states
We add two more steps, AddDisk and StartVM to the bottom of the schema (see Adding two further states).
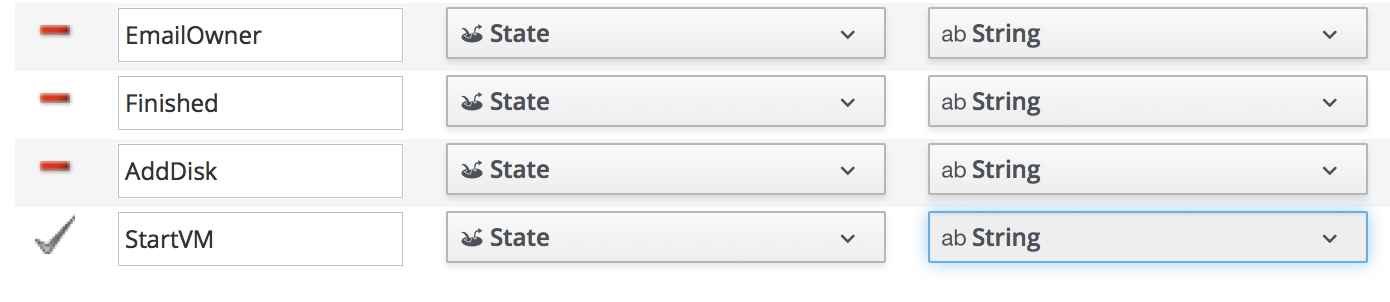
Figure 2. Adding two further states
Adjust the sequence
Now we adjust the class schema sequence so that our new states come after PostProvision (see Adjusting the class schema sequence).
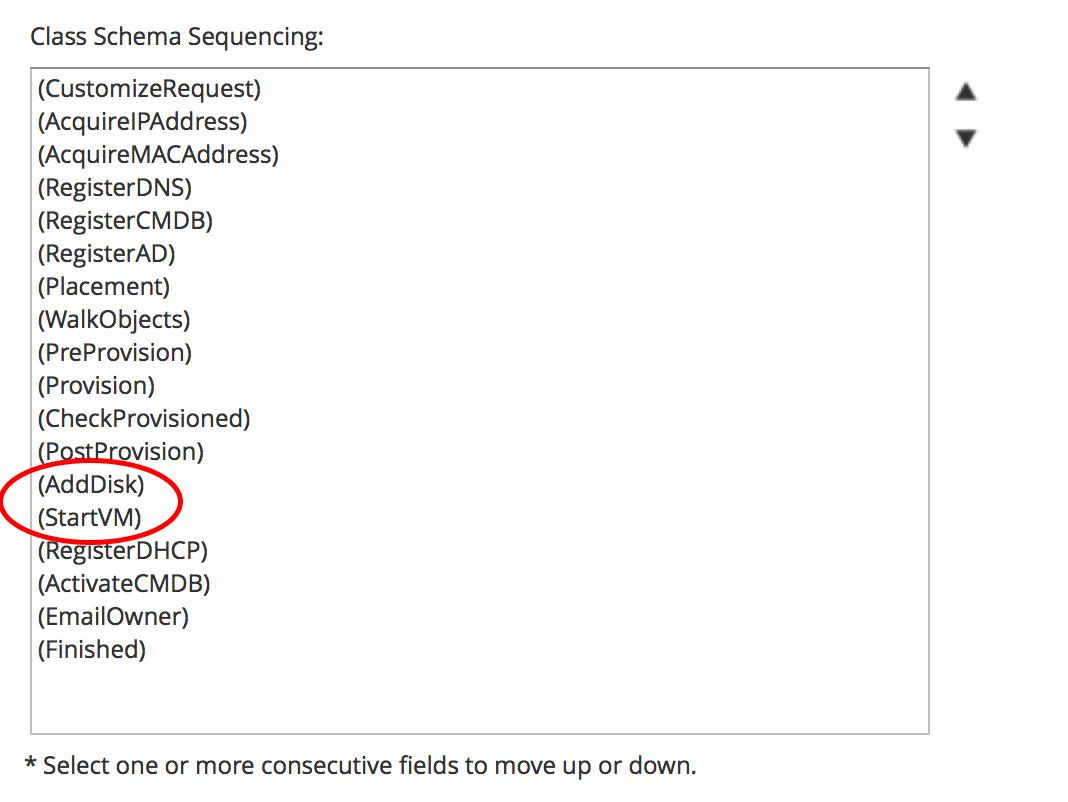
Figure 3. Adjusting the class schema sequence
Step 2. Disable Auto-Power-On
We’re going to override the default behaviour of the VM provisioning workflow which is to auto-start a VM after provisioning. We do this because we want to add our new disk with the VM powered off, and then power on the VM ourselves afterwards.
Copy the method
We copy the /Infrastructure/VM/Provisioning/StateMachines/Methods/redhat_CustomizeRequest method from the ManageIQ domain (if we’re using ManageIQ) or from the RedHat domain (if we’re using CloudForms) into ours (see Copying the redhat_CustomizeRequest method into our own domain).
|
Note
|
The RedHat domain contains an enhanced version of redhat_CustomizeRequest. We must ensure that we copy and extend the correct version for our product. |
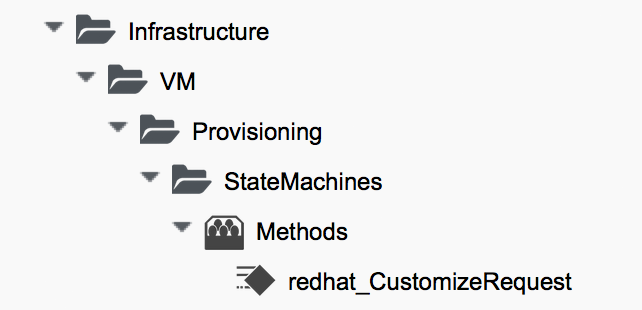
Figure 4. Copying the redhat_CustomizeRequest method into our own domain
Edit the method
We edit redhat_CustomizeRequest to set the options hash key :vm_auto_start to be false. We must do this after the line:
prov = $evm.root["miq_provision"]The additional lines are as follows:
# Get provisioning object
prov = $evm.root["miq_provision"]

####  Add the following lines
# Set the autostart parameter to false so that RHEV won't start the VM directly
$evm.log(:info, "Setting vm_auto_start to false")
prov.set_option(:vm_auto_start, false)
####  End of additional lines
Step 3. Create Our New Instances and Methods
We’ll create a new namespace Integration/RedHat in our own domain, and create a simple one-field Methods class as we did in Writing and Running Our Own Automation Scripts. We add two new instances AddDisk and StartVM, and two new methods add_disk and start_vm to this class (see Adding two new instances and methods).
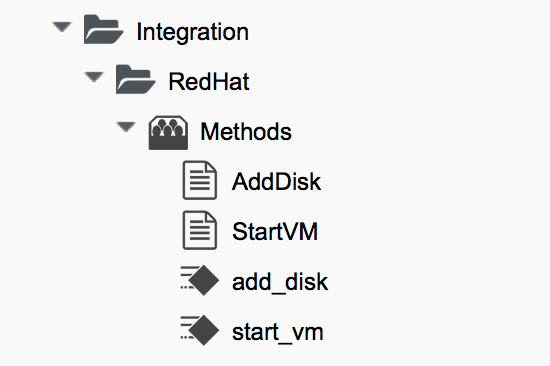
Figure 5. Adding two new instances and methods
Next we’ll examine the interesting parts of the code in each of the methods.
add_disk
add_disk defines its own method call_rhev that handles the REST communication with the Red Hat Enterprise Virtualizaton Manager:
  def call_rhev(servername, username, password, action,
                ref=nil, body_type=:xml, body=nil)
    #
    # If ref is a url then use that one instead
    #
    unless ref.nil?
      url = ref if ref.include?('http')
    end
    url ||= "https://#{servername}#{ref}"

    params = {
      :method => action,
      :url => url,
      :user => username,
      :password => password,
      :headers => { :content_type=>body_type, :accept=>:xml },
      :verify_ssl => false
    }
    params[:payload] = body if body
    rest_response = RestClient::Request.new(params).execute
    #
    # RestClient raises an exception for us on any non-200 error
    #
    return rest_response
  end
In the main section of code we account for the fact that we’re allowing add_disk to be callable in either of two ways: from a button on a virtual machine in the WebUI, or as part of the VM provision workflow. (see Ways of Entering Automate). We first need to find out how add_disk has been called, and retrieve the virtual machine service model object accordingly.
We also need to determine the new disk size. If add_disk has been called from a button, the new disk size will have been passed as a service dialog element. If it’s called as part of a VM provisioning operation we’ll hardcode this as the NEW_DISK_SIZE constant (for this example it’s 30GB):
  case $evm.root['vmdb_object_type']
  when 'miq_provision'                  # called from a VM provision workflow
    vm = $evm.root['miq_provision'].destination
    disk_size_bytes = NEW_DISK_SIZE * 1024**3
  when 'vm'
    vm = $evm.root['vm']                # called from a button
    disk_size_bytes = $evm.root['dialog_disk_size_gb'].to_i * 1024**3
  end
We’re going to create the new disk on the same storage domain as the existing first disk, so we need to find the existing storage domain details:
  storage_id = vm.storage_id rescue nil
  #
  # Extract the RHEV-specific Storage Domain ID
  #
  unless storage_id.nil? || storage_id.blank?
    storage = $evm.vmdb('storage').find_by_id(storage_id)
    storage_domain_id = storage.ems_ref.match(/.*\/(\w.*)$/)[1]
  end
Next we extract the credentials of the RHEV Manager (from the ext_management_system object), as we’ll need to use these when we make the REST call. We also build our XML payload using the Nokogiri gem:
  unless storage_domain_id.nil?
    #
    # Extract the IP address and credentials for the RHEV provider
    #
    servername = vm.ext_management_system.ipaddress ||
                                            vm.ext_management_system.hostname
    username = vm.ext_management_system.authentication_userid
    password = vm.ext_management_system.authentication_password

    builder = Nokogiri::XML::Builder.new do |xml|
      xml.disk {
        xml.storage_domains {
          xml.storage_domain :id => storage_domain_id
        }
        xml.size disk_size_bytes
        xml.type 'system'
        xml.interface 'virtio'
        xml.format 'cow'
        xml.bootable 'false'
      }
    end

    body = builder.to_xml
We make the REST call to the RHEV Manager, and parse the response:
    $evm.log(:info,
              "Adding #{disk_size_bytes / 1024**3} GByte disk to VM: #{vm.name}")
    response = call_rhev(servername, username, password, :post, \
                                               "#{vm.ems_ref}/disks", :xml, body)
    #
    # Parse the response body XML
    #
    doc = Nokogiri::XML.parse(response.body)
The initial response back from the API contains some hrefs that we need to use, so we extract those:
    #
    # Pull out some reusable hrefs from the initial response
    #
    disk_href = doc.at_xpath("/disk")['href']
    creation_status_href = \
                       doc.at_xpath("/disk/link[@rel='creation_status']")['href']
    activate_href = doc.at_xpath("/disk/actions/link[@rel='activate']")['href']
We poll the API for the completion status:
|
Note
|
It’s not good practice to sleep in an Automate method. For simplicity in this example we’re handling the sleep → retry counter logic ourselves to avoid the possibility of sleeping forever. In a production environment we’d use the built-in state machine retry logic to handle this for us.
|
    #
    # Validate the creation_status (wait for up to a minute)
    #
    creation_status = doc.at_xpath("/disk/creation_status/state").text
    counter = 13
    while creation_status != "complete"
      counter -= 1
      if counter == 0
        raise "Timeout waiting for new disk creation_status to reach \
                              \"complete\": Creation Status = #{creation_status}"
      else
        sleep 5
        response = call_rhev(servername, username, password, :get,
                                                 creation_status_href, :xml, nil)
        doc = Nokogiri::XML.parse(response.body)
        creation_status = doc.at_xpath("/creation/status/state").text
      end
    end
If the disk has been attached to a powered-on VM (as it may have been if the method is called from a button), we would need to activate the disk in RHEV. If the VM is powered off when the disk is added, this stage is unnecessary:
    #
    # Disk has been created successfully,
    # now check its activation status and if necessary activate it
    #
    response = call_rhev(servername, username, password, :get,
                                                            disk_href, :xml, nil)
    doc = Nokogiri::XML.parse(response.body)
    if doc.at_xpath("/disk/active").text != "true"
      $evm.log(:info, "Activating disk")
      body = "<action/>"
      response = call_rhev(servername, username, password, :post,
                                                        activate_href, :xml, body)
    else
      $evm.log(:info, "New disk already active")
    end
  end
  #
  # Exit method
  #
  $evm.root['ae_result'] = 'ok'
  exit MIQ_OK
start_vm
The code for start_vm is as follows:
begin
  vm = $evm.root['miq_provision'].destination
  $evm.log(:info, "Current VM power state = #{vm.power_state}")
  unless vm.power_state == 'on'
    vm.start
    vm.refresh
    $evm.root['ae_result'] = 'retry'
    $evm.root['ae_retry_interval'] = '30.seconds'
  else
    $evm.root['ae_result'] = 'ok'
  end

rescue => err
  $evm.log(:error, "[#{err}]\n#{err.backtrace.join("\n")}")
  $evm.root['ae_result'] = 'error'
end
The full scripts are also available from here
Step 4. Add Our New Instances to the Copied State Machine
Now we edit our copied Provision VM from Template state machine instance to add the AddDisk and StartVM instance URIs to the appropriate steps (see Adding the instance URIs to the provisioning state machine).
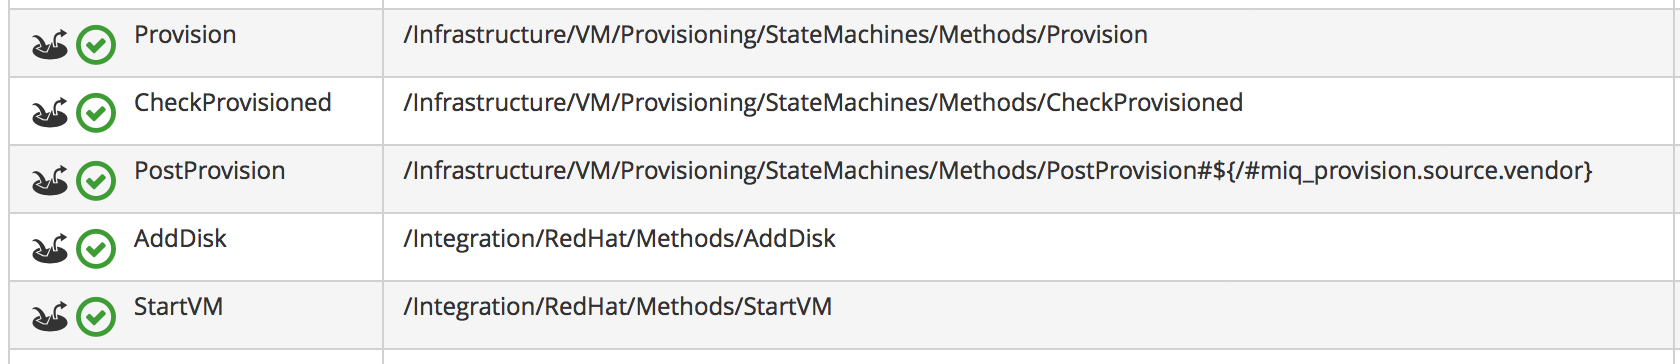
Figure 6. Adding the instance URIs to the provisioning state machine
Step 5. Provision a Virtual Machine
We’ll provision a VM to test this. We should see that the VM is not immediately started after creation, and suitable messages in automation.log show that our additional methods are working:
...<AEMethod add_disk> Adding 30GB disk to VM: rhel7srv006
...<AEMethod add_disk> Creation Status: pending
...<AEMethod add_disk> Creation Status: complete
...<AEMethod add_disk> New disk already active
...
...<AEMethod start_vm> Current VM power state = off
...<AEMethod start_vm> Current VM power state = unknown
...<AEMethod start_vm> Current VM power state = on
We can take a look at the number of disks in the virtual machine Details page in the ManageIQ WebUI (see VM details pane showing additional disk).

Figure 7. VM details pane showing additional disk
Here we see the second disk attached to the virtual machine. Our modified VM provisioning workflow has been successful.
Summary
This chapter has shown how we can extend the provisioning state machine to add our own workflow stages. Although this has been a simple example, some kind of provisioning workflow extension is very common in practice. We see another example in Integrating with Satellite 6 During Provisioning where we extend the workflow to register our newly provisioned virtual machine with a Satellite 6 server.
The example has also shown the Integration functionality of CloudForms/ManageIQ, and how we can use API calls - in this case using the REST client - to extend our workflows into the wider enterprise.