
Service Dialogs
When we design our services in CloudForms or ManageIQ, we try to simplify the ordering process for our users as much as possible. We pre-configure as many provisioning choices as we can, and ideally offer a small selection of options in the form of a service dialog to allow our users to customise their service request. An example might be to offer a simple 'T-Shirt size' ordering style to specify the size of a virtual machine (see Ordering virtual machines in 'T-shirt' sizes).
Figure 1. Ordering virtual machines in 'T-shirt' sizes
We have already seen how to create a simple service dialog in Working with Virtual Machines. This chapter will discuss service dialogs in more detail, and show how we can create dynamic elements that are populated at runtime when the user orders the catalog item.
Dialog Elements
The service dialog that we created in Working with Virtual Machines used two simple Text Box elements. In addition to text boxes, there are several other element types that we can use (see The available dialog element types).
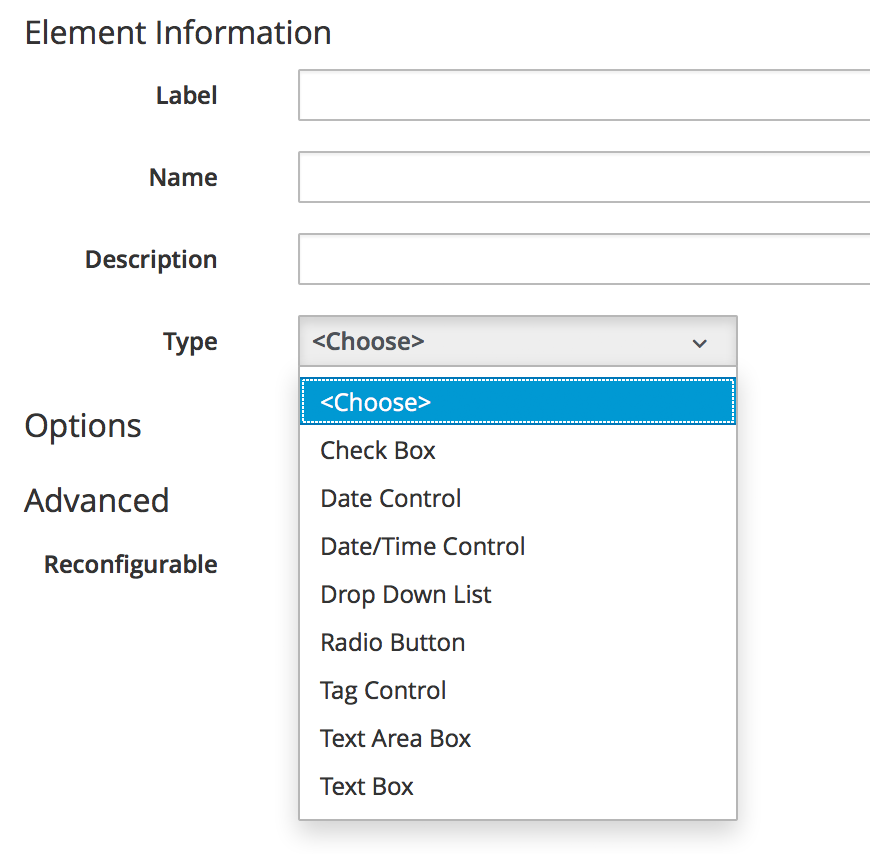
Figure 2. The available dialog element types
Service dialog elements gained several useful new features with recent versions of ManageIQ, as we’ll see in this chapter.
Dynamic Elements
Prior to CloudForms 3.2/ManageIQ Botvinnik only one element type was capable of dynamic (runtime) population, the Dynamic Drop Down List. Botvinnik extended the dynamic population capability to most other dialog element types, so the Dynamic Drop Down List has been removed as a separate element type.
Dynamic elements are populated from a method, called either when the service dialog is initially displayed, or from an optional Refresh button (dynamic elements can also be autorefreshed, as we’ll see shortly). The URI to the method is specified when we add the element and select the checkbox to make it dynamic.
Populating the Dynamic Fields
The dynamic element has its own $evm.object. We need to populate some predefined hash key/value pairs in this object to define the dialog field settings, and to load the data to be displayed. Here is an example of how we do this:
dialog_field = $evm.object

# sort_by: value / description / none
dialog_field["sort_by"] = "value"

# sort_order: ascending / descending
dialog_field["sort_order"] = "ascending"

# data_type: string / integer
dialog_field["data_type"] = "integer"

# required: true / false
dialog_field["required"] = true

dialog_field["values"] = {2 => "2GB", 4 => "4GB", 16 => "16GB"}
dialog_field["default_value"] = 2
If the dynamic element type is a drop-down list, the values key of this hash is also a hash of key/value pairs. Each key/value pair in this hash represents a value to be displayed in the element, and the corresponding 'data_type' value to be returned to Automate as the dialog_* option if that choice is selected.
Here is another, more real-world example of the versatility of dynamic elements:
  values_hash = {}
  values_hash['!'] = '-- select from list --'
  user_group = $evm.root['user'].ldap_group
  #
  # Everyone can provision to DEV and UAT
  #
  values_hash['dev'] = "Development"
  values_hash['uat'] = "User Acceptance Test"
  if user_group.downcase =~ /administrators/
    #
    # Administrators can also provision to PRE-PROD and PROD
    #
    values_hash['pre-prod'] = "Pre-Production"
    values_hash['prod'] = "Production"
  end

  list_values = {
     'sort_by'    => :value,
     'data_type'  => :string,
     'required'   => true,
     'values'     => values_hash
  }
  list_values.each { |key, value| $evm.object[key] = value }
This example populates a dynamic drop-down list with infrastructure lifecycle environments into which a user can provision a new virtual machine. If the user is a member of group containing the string "administrators", then a further two environments: "Pre-Production" and "Production" are added to the list.
Read-Only and Protected Elements
CloudForms 3.1/ManageIQ Anand added the ability to mark a text box as protected, which results in any input being obfuscated. This is particularly useful for inputting passwords (see Dialog that prompts for a password in a protected element).
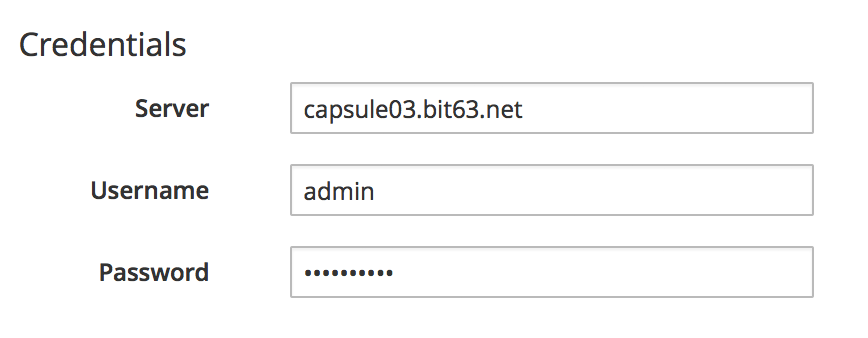
Figure 3. Dialog that prompts for a password in a protected element
ManageIQ Botvinnik introduced the concept of read-only elements for service dialogs, that cannot be changed once displayed. Having a text box dynamically populated, but read-only, makes it ideal for displaying messages.
Programmatically Populating a Read-Only Text Box
We can use dynamically populated read-only text or text area boxes as status boxes to display messages. Here is an example of populating a text box with a message, depending on whether the user is provisioning into Amazon or not:
 if $evm.root['vm'].vendor.downcase == 'amazon'
   status = "Valid for this VM type"
 else
   status = 'Invalid for this VM type'
 end
 list_values = {
    'required'   => true,
    'protected'  => false,
    'read_only'  => true,
    'value'      => status,
  }
  list_values.each do |key, value|
    $evm.object[key] = value
  end
Element Validation
CloudForms 3.2/ManageIQ Botvinnik introduced the ability to add input field validation to dialog elements. Currently the only validator types are None or Regular Expression, but regular expressions are useful for validating input for values such as IP Addresses (see Validator rule for an IP address element).
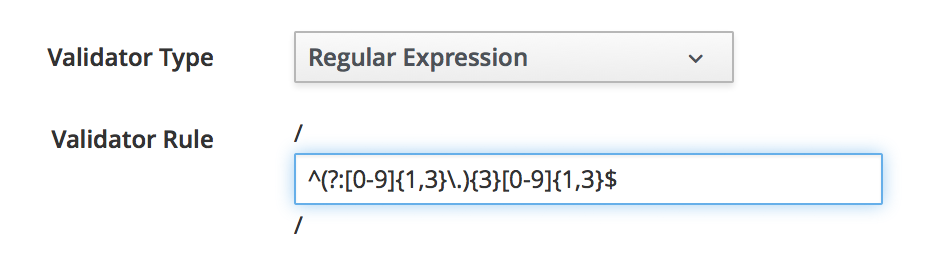
Figure 4. Validator rule for an IP address element
Using the Input from One Element in Another Element’s Dynamic Method
We can link elements in such a way that a user’s input in one element can be used by subsequent dynamic elements that are refreshable. The subsequent dynamic method, when refreshed, can access the first element’s input value using $evm.root['dialog_elementname'] or $evm.object['dialog_elementname']. Elements can be refreshed with a Refresh button, but CloudForms 4.0/ManageIQ Capablanca added the ability to mark dynamic elements with the Auto refresh characteristic. There is a corresponding characteristic Auto Refresh other fields when modified that we can apply to the initial element at the start of this refresh chain.
We can use this in several useful ways, such as to populate a dynamic list based on a value input previously, or to create a validation method.
Example
The following is an example service dialog requirement, and how it was matched by a solution.
Requirement
We have a service dialog containing a text box element called tenant_name. Into this element the user should type the name of a new OpenStack tenant to be created in each of several OpenStack providers. The tenant name should be unique, and not currently exist in any provider.
We would like to add a validation capability to the service dialog to check that the tenant name doesn’t already exist before the user clicks on the Submit button.
Solution
In the following example a read-only text area box element called validation is used to display a validation message. The user is instructed to click the Refresh button to validate their input to the tenant_name field.
Until the Refresh button is clicked, the validation text area box displays "Validation…". Once the Refresh button is clicked, the validation message changes according to whether the tenant exists or not.
display_string = "Validation...\n"
tenant_found = false

tenant_name = $evm.root['dialog_tenant_name']
unless tenant_name.length.zero?
  lowercase_tenant = tenant_name.gsub(/\W/,'_').downcase
  tenant_objects = $evm.vmdb('CloudTenant').find(:all)
  tenant_objects.each do | tenant |
    if tenant.name.downcase == lowercase_tenant
      tenant_found = true
      display_string += "   Tenant \'#{tenant.name}\' exists in OpenStack "
      display_string += "Provider: #{$evm.vmdb('ems', tenant.ems_id).name}\n"
    end
  end
  unless tenant_found
    display_string += "   Tenant \'#{lowercase_tenant}\' is available for use"
  end
end

list_values = {
  'required'   => true,
  'protected'  => false,
  'read_only'  => true,
  'value'      => display_string,
}
list_values.each do |key, value|
  $evm.log(:info, "Setting dialog variable #{key} to #{value}")
  $evm.object[key] = value
end
exit MIQ_OK
Summary
This chapter shows the flexibility we have when we build our service dialogs. We can use dynamic methods to pre-load appropriate options into dialog elements, thereby customising the dialog options on a per-user basis. We can also create confirmation text boxes that allow users to validate their inputs, and thus allow changes if necessary before clicking Submit.
It is worth noting that dynamic dialog methods always run on the WebUI appliance that we are logged into, whether or not this appliance has the Automation Engine server role set. This can have unexpected consequences. Our real-world CloudForms or ManageIQ installations may comprise several appliances distributed between multiple zones, often with firewalls between (see Typical real-world CloudForms installation with multiple appliances and zones).
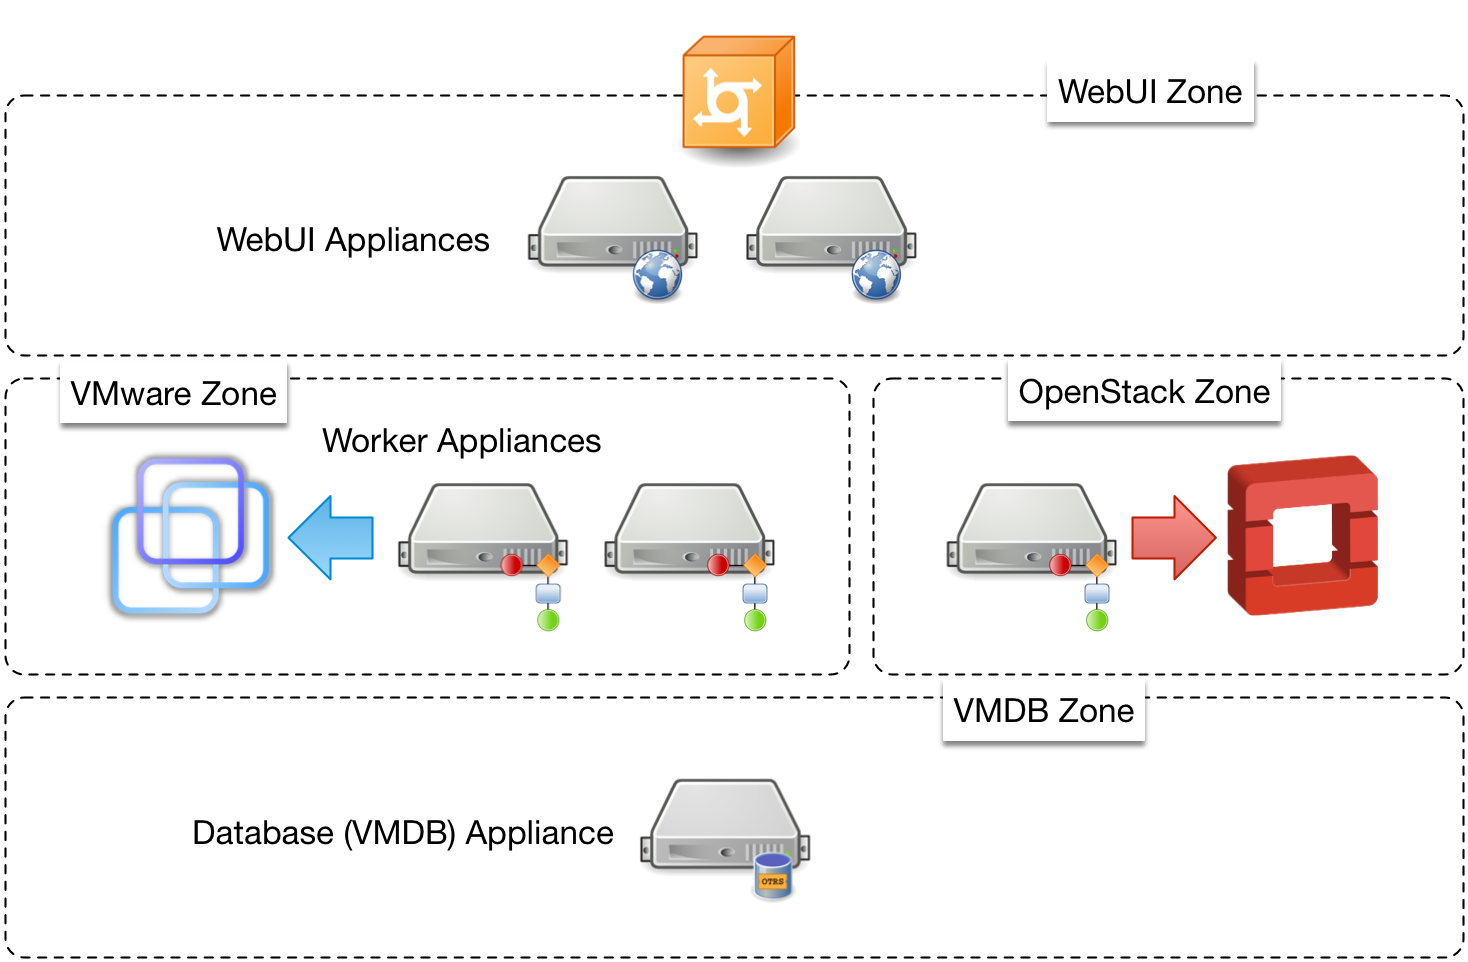
Figure 5. Typical real-world CloudForms installation with multiple appliances and zones
If we write a dynamic dialog method to retrieve any information from an external system, we might expect the method to run on any of our provider zone 'worker' appliances, but it doesn’t. We must ensure that the WebUI zone firewalls allow our WebUI appliances to directly connect to any external systems that our dialog methods need access to.