# arg1 = version
args = ['1.1']

# arg2 = templateFields
args << {'name'         => 'rhel7-generic',
         'request_type' => 'template'}

# arg3 = vmFields
args << {'vm_name'   => 'rhel7srv010',
         'vlan'      => 'public',
         'vm_memory' => '1024'}

# arg4 = requester
args << {'owner_email'      => 'pemcg@bit63.com',
         'owner_first_name' => 'Peter',
         'owner_last_name'  => 'McGowan'}

# arg5 = tags
args << nil

# arg6 = additionalValues (ws_values)
args << {'disk_size_gb' => '50',
           'mountpoint' => '/opt'}

# arg7 = emsCustomAttributes
args << nil

# arg8 = miqCustomAttributes
args << nil

request_id = $evm.execute('create_provision_request', *args)Creating Provisioning Requests Programmatically
As we’ve seen, the most common way to provision a virtual machine is via the CloudForms or ManageIQ WebUI (see Provisioning a Virtual Machine). We click on Lifecycle → Provision VMs, complete the provisioning dialog, and a few minutes later our new virtual machine is ready.
There are times however when it is useful to be able to automate the initiation of a virtual machine provisioning workflow, with no manual interaction whatsoever. This allows us to autoscale our virtual infrastructure, based on real-time or anticipated performance criteria. We can start the provisioning process programmatically, either by calling $evm.execute from a running automation script to run the method create_provision_request (see $evm and the Workspace for more information on these methods), or by using the RESTful API.
Calling create_provision_request
The create_provision_request method takes an array of arguments, which correspond to the argument list for the original EVMProvisionRequestEx SOAP API call. A typical call to provision a VM into RHEV might be:
Argument List
The arguments to the create_provision_request call are described below. The arguments match the fields in the provisioning dialog (and the values from the corresponding YAML template), and any arguments that are set to required: true in the dialog YAML, but don’t have a :default: value, should be specified. The exception for this is for sub-dependencies of other options, for example if :provision_type: is pxe then the sub-option :pxe_image_id: is mandatory. If the :provision_type: value is anything else then :pxe_image_id: is not relevant.
In CloudForms/ManageIQ versions prior to 4.0/Capablanca the arguments were specified as a string, with each value separated by a pipe ('|') symbol, like so:
"vm_name=rhel7srv010|vlan=public|vm_memory=1024"With 4.0/Capablanca however this syntax has been deprecated, and the options within each argument type should be defined as a hash as shown in the preceding example. This is more compatible with the equivalent RESTful API call to create a provisioning request.
The value for each hashed argument pair should always be a string, for example:
{'number_of_vms' => '4'}rather than:
{'number_of_vms' => 4}version
The version argument refers to the interface version. It be set to 1.1
templateFields
The templateFields argument denoted fields specifying the VM or template to use as the source for the provisioning operation. We supply a guid or ems_guid to protect against matching same-named templates on different providers within ManageIQ. Currently the only request_type field supported is template, for example:
'request_type' => 'template'vmFields
vmFields allows for the setting of properties from the Catalog, Hardware, Network, Customize, and Schedule tabs in the provisioning dialog. Some of these are provider-specific, so when provisioning an OpenStack instance for example, we need to specify the instance_type
# arg2 = vmFields
arg2 = {'number_of_vms'   => '3',
        'instance_type'   => '1000000000007', # m1.small
        'vm_name'         => "#{$instance_name}",
        'retirement_warn' => "#{2.weeks}"}
args << arg2
requester
The requester argument allows for the setting of properties from the Request tab in the provisioning dialog. owner_email, owner_first_name and owner_last_name are required fields.
tags
The tags argument refers to tags to apply to newly created VM, for example:
{'server_role' => 'web_server',
 'cost_centre' => '0011'}
additionalValues (aka ws_values)
additionalValues, also known as ws_values, are name/value pairs stored with a provision request, but not used by the core provisioning code. These values are usually referenced from automate methods for custom processing. They are added into the request options hash, and can be retrieved as a hash from:
$evm.root['miq_provision'].options[:ws_values]emsCustomAttributes
emsCustomAttributes are custom attributes applied to the virtual machine through the provider as part of provisioning. Not all providers support this, although VMware does support native vCenter custom attributes, which if set are visible both in ManageIQ and in the vSphere/vCenter UI.
miqCustomAttributes
miqCustomAttributes are custom attributes applied to the virtual machine and stored in the VMDB as part of provisioning. These VMDB-specific custom attributes are displayed on the VM details page (see Working with Virtual Machines for an example of setting a custom attribute from a script).
Setting Placement Options
The Rails code that implements the create_provision_request call makes the assumption that any noninteractive provision request will be using automatic placement, and it sets options[:placement_auto] = [true, 1] as a request option. This also means however that it disregards any vmFields options that we may set that are normally found under the Environment tab of an interactive provision request, such as cloud_tenant or cloud_network (see Setting the environment placement options for a cloud instance). These settings are hidden in the WebUI if we select Choose Automatically.
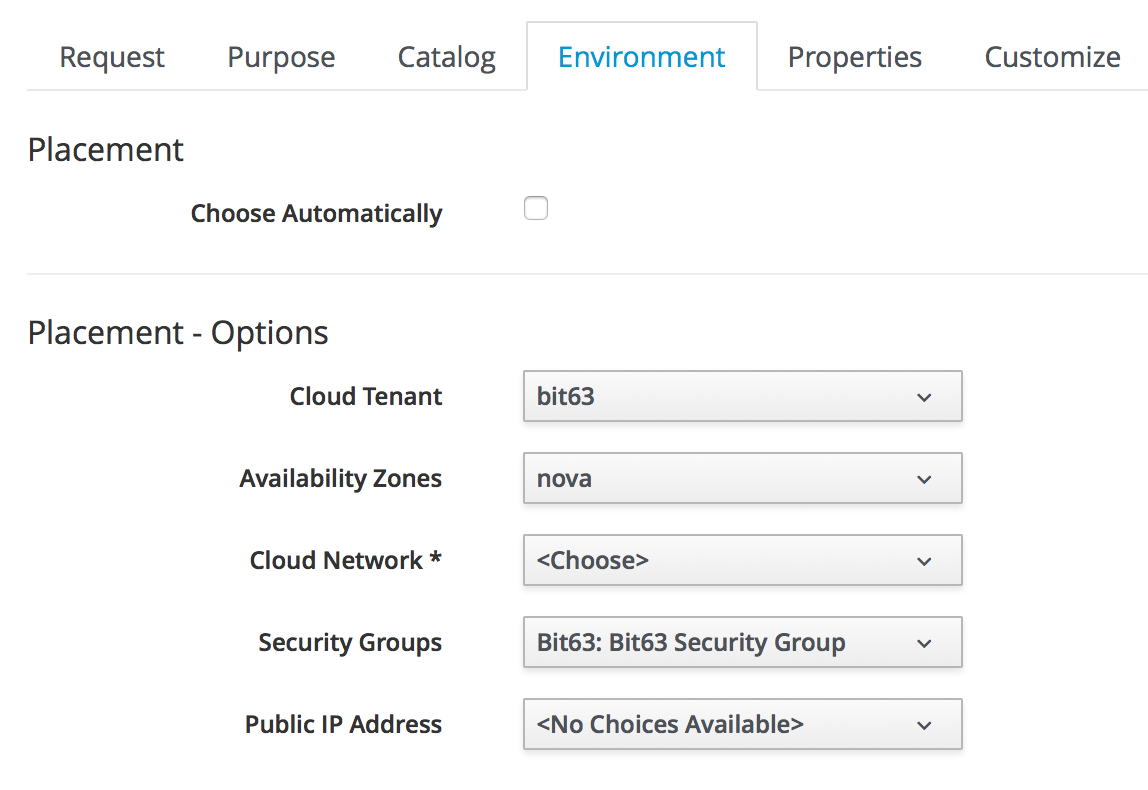
Figure 1. Setting the environment placement options for a cloud instance
With CloudForms 4.1/ManageIQ Darga and later we can override this behaviour by explicitly setting :placement_auto to be false in the vmFields argument, and then setting the placement options ourselves, as follows:
arg2 = {
  "vm_name"                     => "test_001",
  "instance_type"               => "2",
  "placement_auto"              => "false",
  "placement_availability_zone" => "2",
  "cloud_network"               => "2",
  "cloud_subnet"                => "3",
  "security_groups"             => "64"
},
Note that we must specify the object IDs as the values for these placement-related hash keys.
Creating a Provisioning Request Using the RESTful API
We can issue a provisioning request programmatically by issuing a POST to the /api/provision_requests REST URI. Our post parameters are similar to the argument list for create_provision_request, for example:
  post_params = {
    'version'               => '1.1',
    'template_fields'       => {
      'name'                => 'rhel72-generic',
      'request_type'        => 'template'
    },
    'vm_fields'             => {
      'number_of_cpus'      => '1',
      'vm_name'             => 'rhel7srv012',
      'vm_memory'           => '2048',
      'vlan'                => 'public'
    },
    'requester'             => {
      'owner_first_name'    => 'Peter',
      'owner_last_name'     => 'McGowan',
      'owner_email'         => 'pemcg@bit63.com',
    },
    'tags'                  => {
      'location'            => 'winchester'
    },
    'additional_values'     => {
      'disk_size_gb'        => '50',
      'mountpoint'          => '/opt'
    },
    'ems_custom_attributes' => {},
    'miq_custom_attributes' => {}
  }.to_json
As we typically make multiple calls to the REST API as part of a programmatic provisioning operation, it’s more efficient to request an authentication token once and then use that with subsequent calls, as follows:
api_uri = 'https://myserver/api'
url = URI.encode(api_uri + '/auth')
rest_return = RestClient::Request.execute(
                          method:    :get,
                          url:        url,
                          :user       => username,
                          :password   => password,
                          :headers    => {:accept => :json},
                          verify_ssl: false)
auth_token = JSON.parse(rest_return)['auth_token']
Once we have our authentication token we can issue the POST with our provisioning parameters as a payload, like so:
url = URI.encode(api_uri + '/provision_requests')
rest_return = RestClient::Request.execute(
                          method:     :post,
                          url:        url,
                          :headers    => {:accept        => :json,
                                          'x-auth-token' => auth_token},
                          :payload    => post_params,
                          verify_ssl: false)
result = JSON.parse(rest_return)
request_id = result['results'][0]['id']
The request ID is returned to us in the result body, and we can poll this using a GET operation to determine the status of the provisioning operation.
url = URI.encode(api_uri + "/provision_requests/#{request_id}")
rest_return = RestClient::Request.execute(
                          method:     :get,
                          url:        url,
                          :headers    => {:accept        => :json,
                                          'x-auth-token' => auth_token},
                          verify_ssl: false)
Identifying Valid Key Names for the Arguments
The key names that we must specify in the various argument hashes correspond to the keys in the provisioning options hash (see [the-options-hash]). We could use any of our investigative debugging techniques to determine these, but CloudForms 4.1/ManageIQ Darga added a useful command line tool called rebuild_provision_request.rb that we can use to examine the options that were used in a previous provision request, even one that was initiated from the WebUI. We can optionally copy or re-run the request with our own modifications using the REST API if we wish, using the same tool.
The valid command line options for rebuild_provision_request.rb are as follows:
# rails runner tools/rebuild_provision_request.rb -- --help

Usage: rails runner tools/rebuild_provision_request.rb [--options]

Options:

  -a, --api-host=<s>      The hostname to run the api call against (default: localhost)
  -c, --console           Show the output needed to run the POST in a Rails console
  -o, --count=<i>         Adjust the number of request ids (requires -l) (default: 5)
  -l, --last-requests     Show a list of the last 5 request ids
  -t, --output=<s>        The output format (hash, json) (default: hash)
  -p, --password=<s>      The password required for the API request (default: smartvm)
  -n, --port=<i>          The port listening for the request (default: 3000)
  -q, --quiet             Remove verbose output
  -r, --request-id=<i>    The Automate request to rerun
  -g, --run-it            Run the api request after outputting the values
  -s, --ssl               Use SSL when talking to the API
  -u, --username=<s>      The username required for the API request (default: admin)
  -h, --help              Show this message
We can use the tool to list some of our most recent provision requests, like so:
# rails runner tools/rebuild_provision_request.rb -- -l

Searching for the last 5 requests run against http://admin:*****@localhost:3000/api/provision_requests

Found 5 requests: 85,84,83,81,80

85 - Provision from [centos72-generic] to [engtestsrv043]
84 - Provision from [rhel72-generic] to [engdbsrv004]
83 - Provision from [centos72-generic] to [engtestsrv042]
81 - Provision from [rhel-guest-image-7.2] to [engwebsrv009]
80 - Provision from [rhel-guest-image-7.2] to [engwebsrv008]
If we select one of the request IDs, we can display the options that were specified with the request.
# rails runner tools/rebuild_provision_request.rb -r 84 -q

{"version"=>"1.1",
 "template_fields"=>
  {"guid"=>"279e8970-8ed3-11e6-98a1-001a4aa01502",
   "name"=>"rhel72-generic",
   "request_type"=>"template"},
 "vm_fields"=>
  {"root_password"=>"v2:{fg4jbx7,sj*****I+NA+w==}",
   "customization_template_id"=>9,
   "addr_mode"=>"static",
   "hostname"=>"engdbsrv004.bit63.net",
   "placement_auto"=>false,
   "placement_cluster_name"=>1,
   "placement_dc_name"=>2,
   "placement_host_name"=>1,
   "placement_ds_name"=>5,
   "number_of_vms"=>1,
   "provision_type"=>"native_clone",
   "vm_name"=>"engdbsrv004",
   "vm_auto_start"=>true,
   "retirement"=>0,
   "retirement_warn"=>604800,
   "vlan"=>"rhevm",
   "disk_format"=>"default",
   "number_of_sockets"=>1,
   "cores_per_socket"=>1,
   "vm_memory"=>"2048",
   "network_adapters"=>1},
 "requester"=>
  {"owner_first_name"=>"Peter",
   "owner_last_name"=>"McGowan",
   "owner_email"=>"pemcg@gmail.com"},
 "tags"=>{},
 "additional_values"=>nil,
 "ems_custom_attributes"=>nil,
 "miq_custom_attributes"=>nil}
We can use the output from rebuild_provision_request.rb in this way as a template for our own call to either create_provision_request, or to the RESTful API.
Summary
Being able to create provisioning requests programmatically gives us complete control over the process, and has many uses. For example when managing a scalable cloud application, we can configure a CloudForms or ManageIQ alert to detect high CPU utilisation on any of the existing cloud instances making up the workload. We could use the alert to send a management event that runs an Automate method to scale out the workload by provisioning additional instances (see Ways of Entering Automate).
We can also use create_provision_request from custom service catalog items, when the out-of-the-box service provisioning state machines do not provide the functionality that we need (see Service Tips and Tricks).