grep -i "memory\|cpu\|core\|socket" miq_provision_redhat_dialogs_template.yaml
      :number_of_sockets:
        :description: Number of Sockets
      :cores_per_socket:
        :description: Cores per Socket
      :vm_memory:
        :description: Memory (MB)
Creating a Service Catalog Item
In this chapter we’ll go through the steps involved in creating a service catalog item to provision a virtual machine into Red Hat Enterprise Virtualization (RHEV). We’ll create a service dialog that allows the user to specify a name for both the new virtual machine and the service, and specify the number of CPUs and memory size of the provisioned virtual machine from a drop-down list.
|
Note
|
Although for this example we’ll be provisioning into RHEV, the same procedure can be used to create a service catalog item to provision into other providers. |
The Service Dialog
We’re going to create a service dialog to prompt for the number of CPUs, and the amount of memory for the new virtual machine. These two characteristics will be added to the provisioning task object for the new VM, and we know that such items are stored in the task object’s options hash for a provisioning operation. The CatalogItemInitialization state machine can handle the insertion of our dialog values into the options hash for us, as long as we name our dialog elements correctly.
Finding the Correct Element Names
We saw from Catalog{Item,Bundle}Initialization that CatalogItemInitialization recognises and special-cases some element names, including vm_name and service_name, so we can create two of our elements with these names. If this is all we wish to prompt for, then we can move straight on to creating the service dialog.
For our use case however, we are also prompting for number of CPUs, and memory size. Any service dialog fields that we create with the intention of altering the final VM configuration (such as number of CPUs, or memory size), must also be named in a particular way. The element name must match the key in the provisioning task’s options hash that we wish to overwrite.
We can find this key name in either of two ways; by examining the YAML code that makes up the provisioning dialog, or by performing an interactive provision of a virtual machine and examining the provisioning task’s options hash during the provisioning process.
Searching the Provisioning Dialog
The simplest way to search the provisioning dialogs is to copy the appropriate one, edit, then select and paste the contents to a flat file that can be grepped, i.e.
This shows that we probably need to name our elements cores_per_socket and vm_memory.
Examining the options hash during provisioning
As an alternative (or confirmation) to finding the key names from the provisioning dialog, we can use one of the techniques that we learnt in Investigative Debugging to dump the contents of the provisioning task’s options hash during a normal interactive provision. Here is an example of calling object_walker after the PostProvision stage in the VMProvision_VM/template state machine (see State added to the VM provisioning state machine to run object_walker).

Figure 1. State added to the VM provisioning state machine to run object_walker
Using the object_walker_reader after we’ve provisioned a virtual machine, we see that the same values are in the miq_provision task’s options hash:
object_walker_reader.rb | grep 'miq_provision' | grep "memory\|cpu\|core\|socket"
     |    $evm.root['miq_provision'].options[:cores_per_socket] = [1, "1"]
     |    $evm.root['miq_provision'].options[:memory_reserve] = nil
     |    $evm.root['miq_provision'].options[:number_of_sockets] = [1, "1"]
     |    $evm.root['miq_provision'].options[:vm_memory] = ["1024", "1024"]
Some commonly used element names
The following table lists some commonly used element names for typical VM characteristics that can be modified from a service dialog:
| VM characteristic to be modified | Element name |
|---|---|
VM Name |
vm_name |
Number of CPUs |
cores_per_socket &/or number_of_sockets |
VM Memory |
vm_memory |
Root Password |
root_password |
MAC Address (first NIC) |
mac_address |
IP Address (first NIC) |
ip_addr |
OpenStack Flavor |
instance_type |
|
Note
|
Any of the options hash values that set a parameter inside the virtual machine’s operating system (such as root_password or ip_addr) need a mechanism to inject these parameters into the VM once it’s booted. We typically do this using a VMware customization specification in conjunction with VMware tools, or cloud-init. We can define a template cloud-init script that contains substitution variables (from Infrastructure → PXE in the WebUI). Our value from ...
<% root_password = evm[:root_password] %>
chpasswd:
list: |
root:<%=root_password%>
expire: False
...
|
Creating the Service Dialog
We know from the preceding investigation that we must name our service dialog elements: vm_name, service_name, option_0_cores_per_socket and option_0_vm_memory.
We’ll create a new service dialog called RHEL7 VM. Our new service dialog will be similar to the example that we created in Working with Virtual Machines, but this time we’ll create two boxes: Service and VM Names, and VM Characteristics, each containing two elements (see Service dialog with two boxes and four elements).
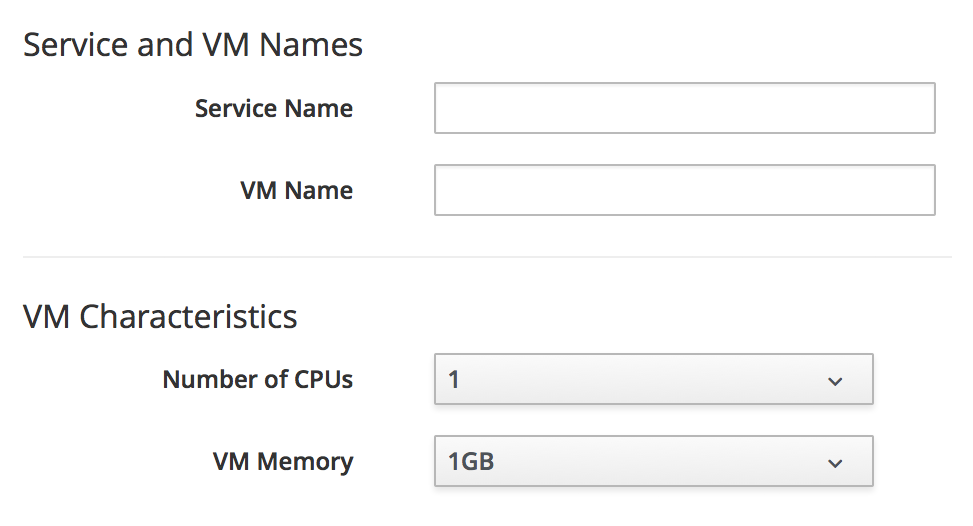
Figure 2. Service dialog with two boxes and four elements
The Service Name and VM Name elements in the first box are both of type Text Box, and have the names service_name and vm_name respectively.
The Number of CPUs element in the second box is of type Drop Down List (see Number of CPUs element).
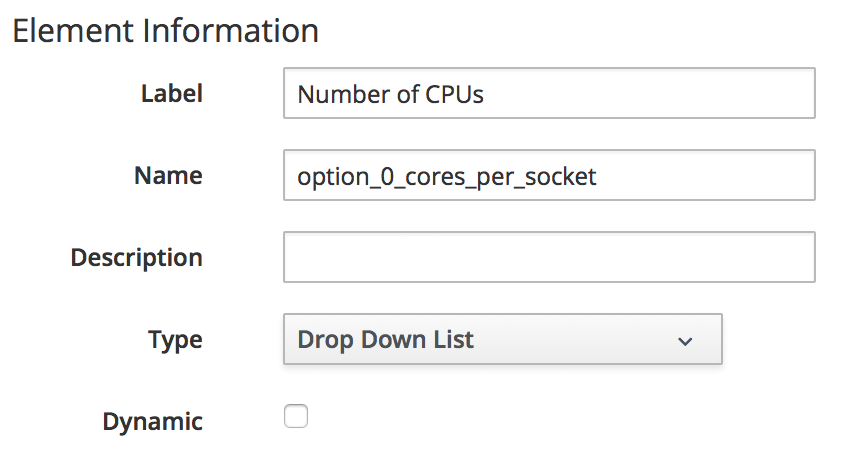
Figure 3. Number of CPUs element
We’ll populate the list with options to provision one, two or four CPUs (see Defining the selection of available CPUs).
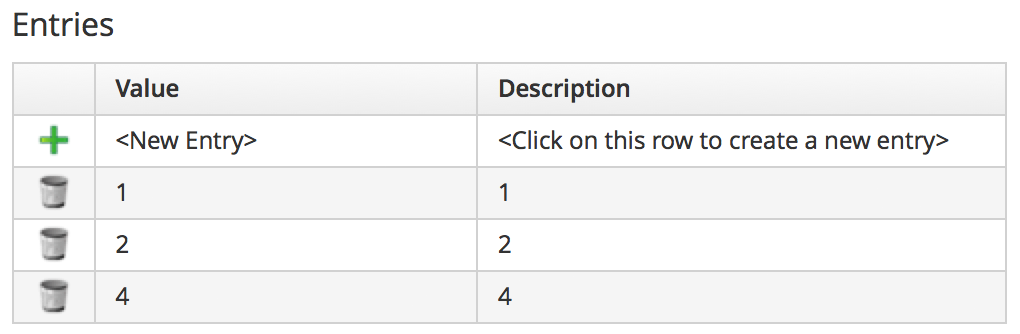
Figure 4. Defining the selection of available CPUs
The VM Memory element in the second box is of type Drop Down List (see VM memory element).
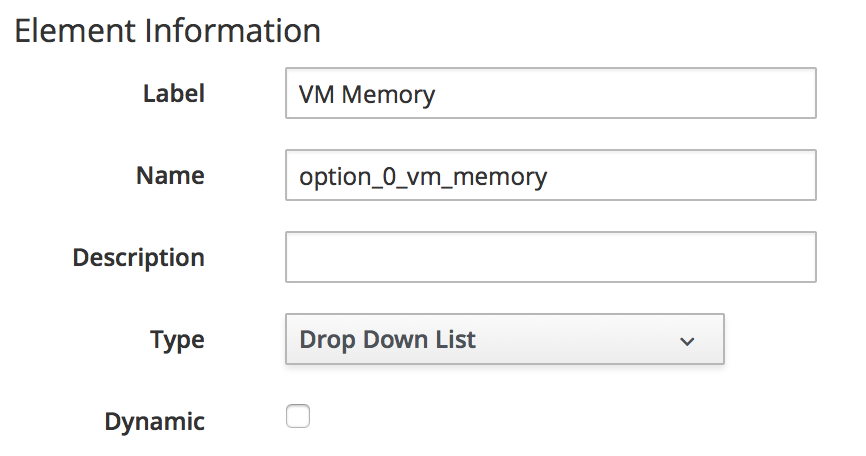
Figure 5. VM memory element
We’ll populate the list with options to provision 1,2,4 or 8 GB of memory (see Defining the selection of available memory).
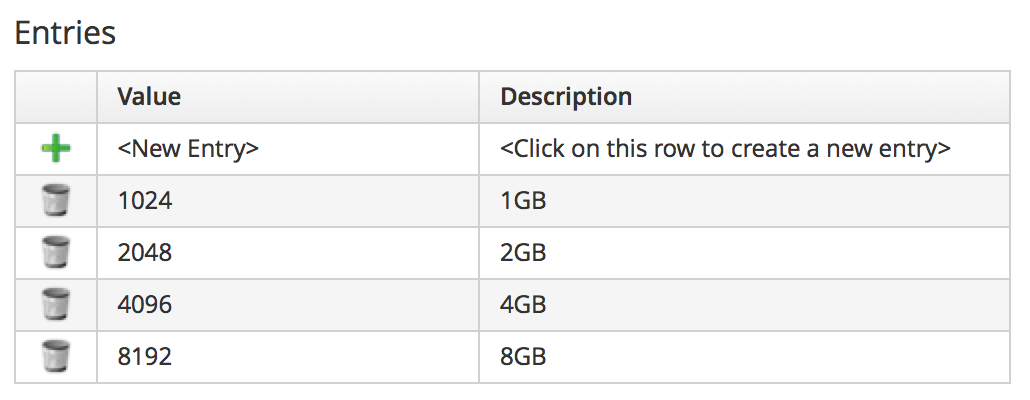
Figure 6. Defining the selection of available memory
Creating the Service Catalog Item
We need to create a service catalog item, but we’ll also create a new service catalog to put the item into.
Create a Catalog
The first thing we should do is create a service catalog to store the service item. We can have many catalogs; they are used to organise or categorise our service items and bundles.
Navigate to the Catalogs section in the accordion, and select Configuration → Add a New Catalog (see Adding a new catalog).
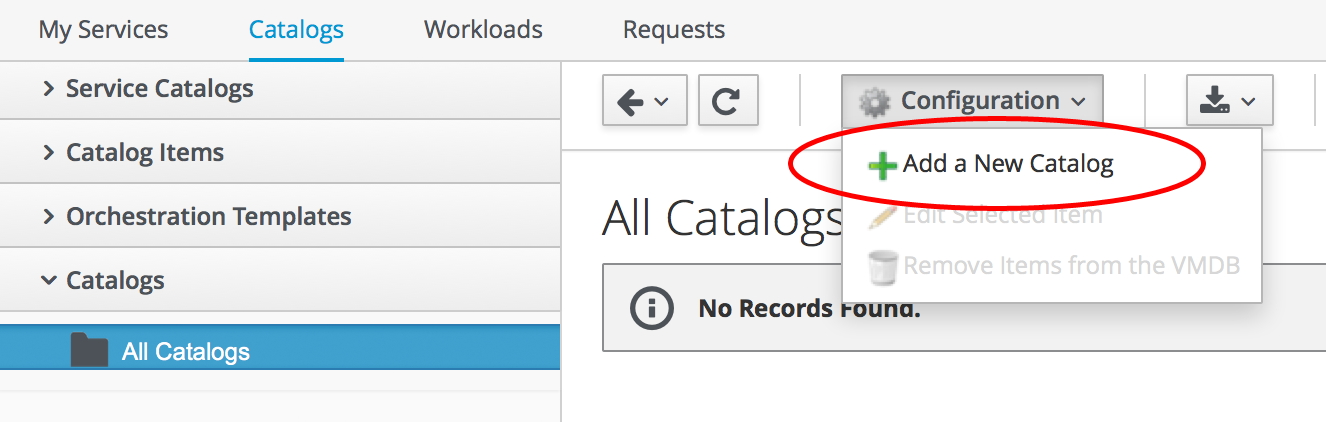
Figure 7. Adding a new catalog
Give the catalog a name (for this example we’ll use "Generic Servers"), leave everything else as default, and click Add.
Creating the Catalog Item
Navigate to the Catalog Items section in the accordion, highlight the newly created Generic Servers catalog, then select Configuration → Add a New Catalog Item (see Adding a new catalog item).
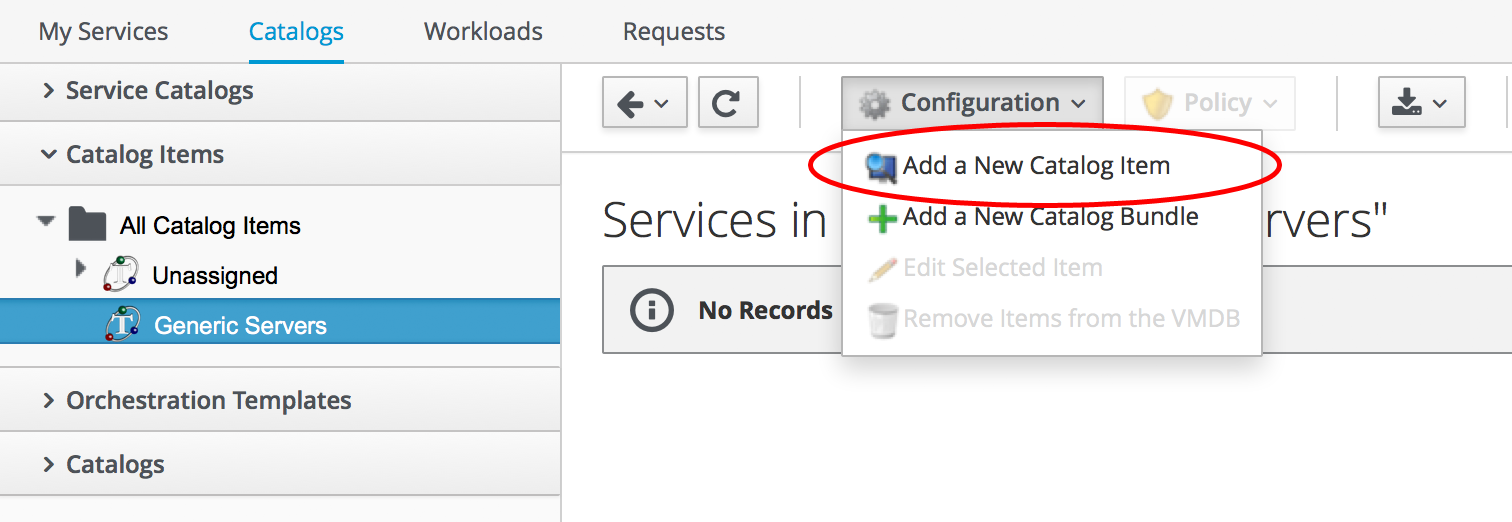
Figure 8. Adding a new catalog item
Select RHEV from the Catalog Item Type drop-down list (see Selecting the catalog item type).
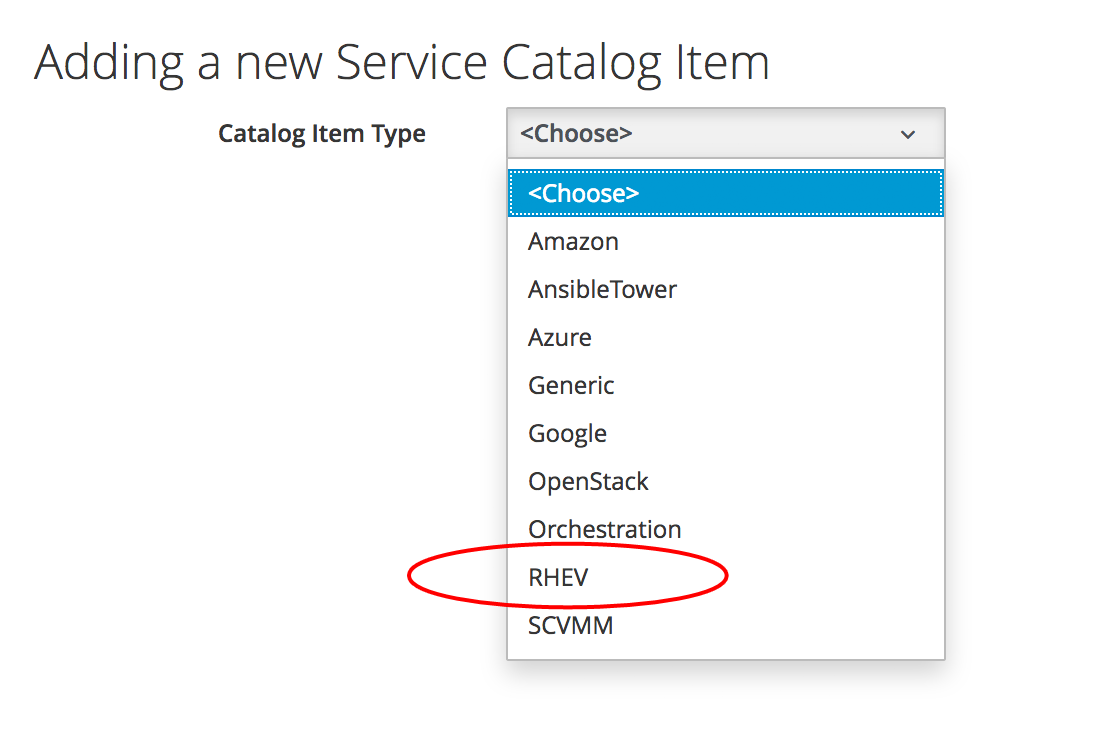
Figure 9. Selecting the catalog item type
Enter a name and description for the catalog item, and select the Display in Catalog check-box to expose the remaining fields to be filled in. Select our newly created Generic Servers catalog and RHEL7 VM dialog in the appropriate drop-downs. For the Provisioning Entry Point, navigate to ManageIQ/Service/Provisioning/StateMachines/ServiceProvision_Template/CatalogItemInitialization (see Completing the basic info tab).
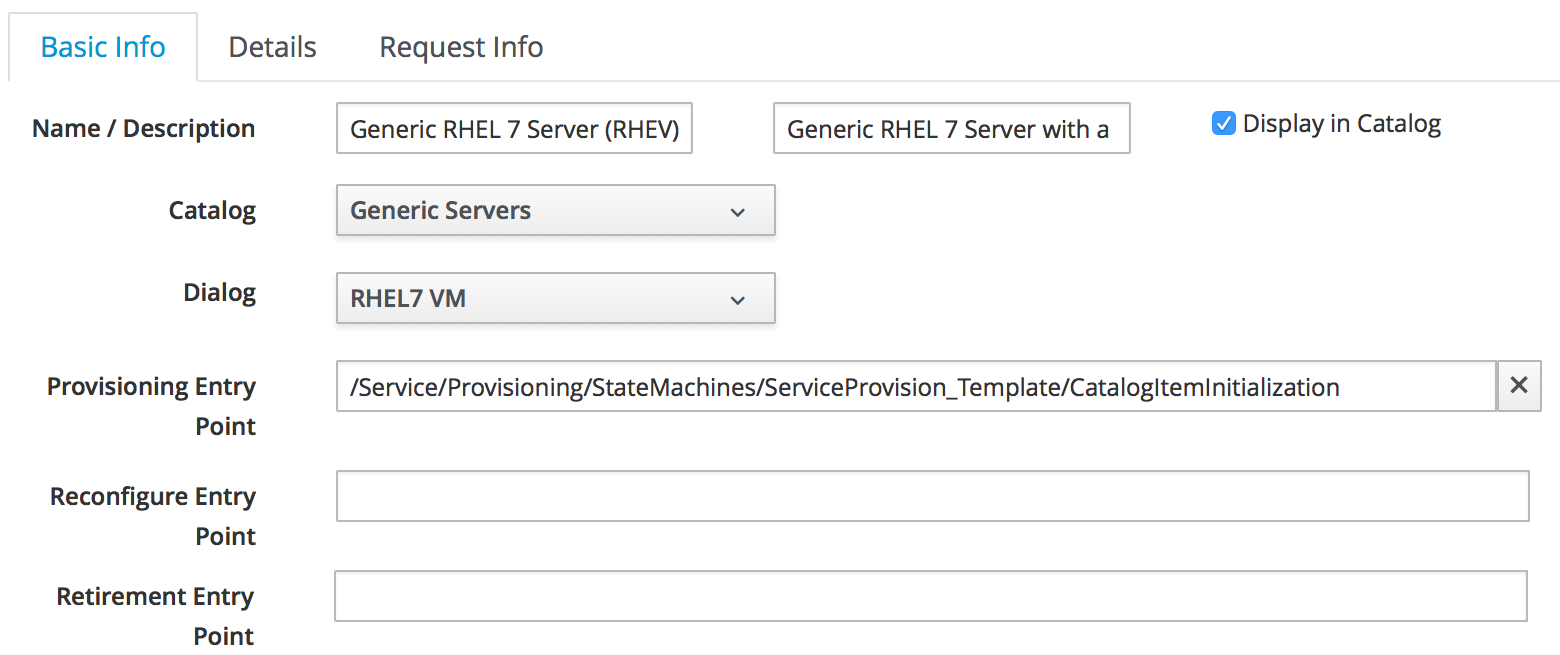
Figure 10. Completing the basic info tab
Click on the Details tab, and enter some HTML-formatted text to describe the catalog item to anyone viewing in the catalog:
<h1>Generic RHEL 7 Server</h1>
<hr>
<p>This catalog item will deploy a <strong>Red Hat Enterprise Linux 7</strong>
server, built from the @Base package set, and patched to 01-March-2016.

A selection of CPU count and memory size can be made when ordering</p>
Click on the Request Info tab, and fill in the details. Select an appropriate template, and Environment, Hardware, Network tab settings that are known to work when a VM is provisioned interactively (see [service-tips-and-tricks]). The VM name will be overwritten during the provisioning process, so here we just set it as changeme (see Completing the request info tab).
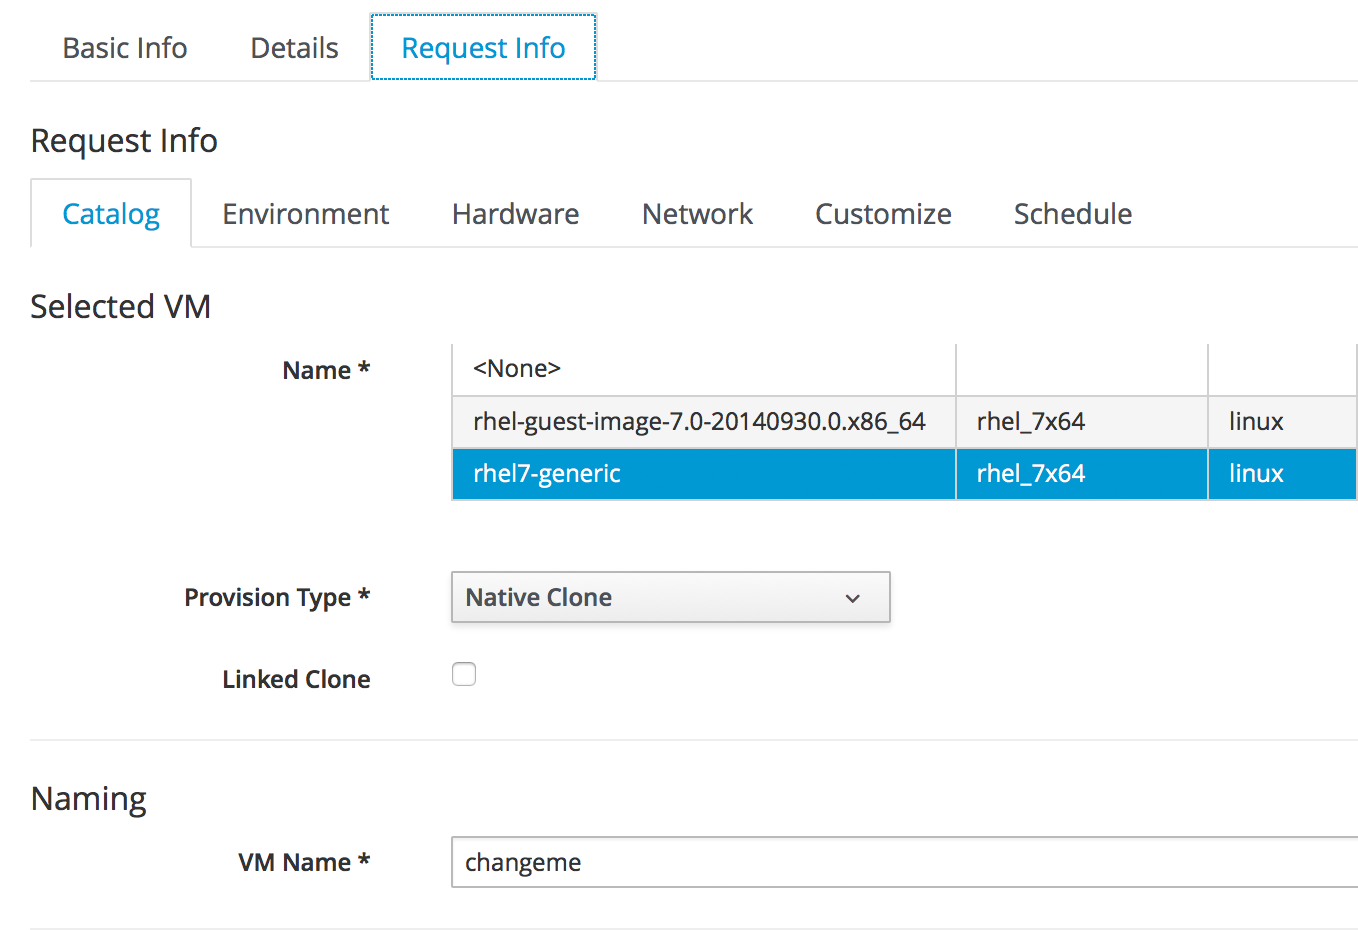
Figure 11. Completing the request info tab
Finally click the Add button.
Select a suitable sized icon for a custom image, and save.
Ordering the Catalog Item
Navigate to the Service Catalogs section in the accordion, expand the Generic Servers Catalog, and highlight the Generic RHEL 7 Server (RHEV) catalog item (see Navigating to the service catalog item).
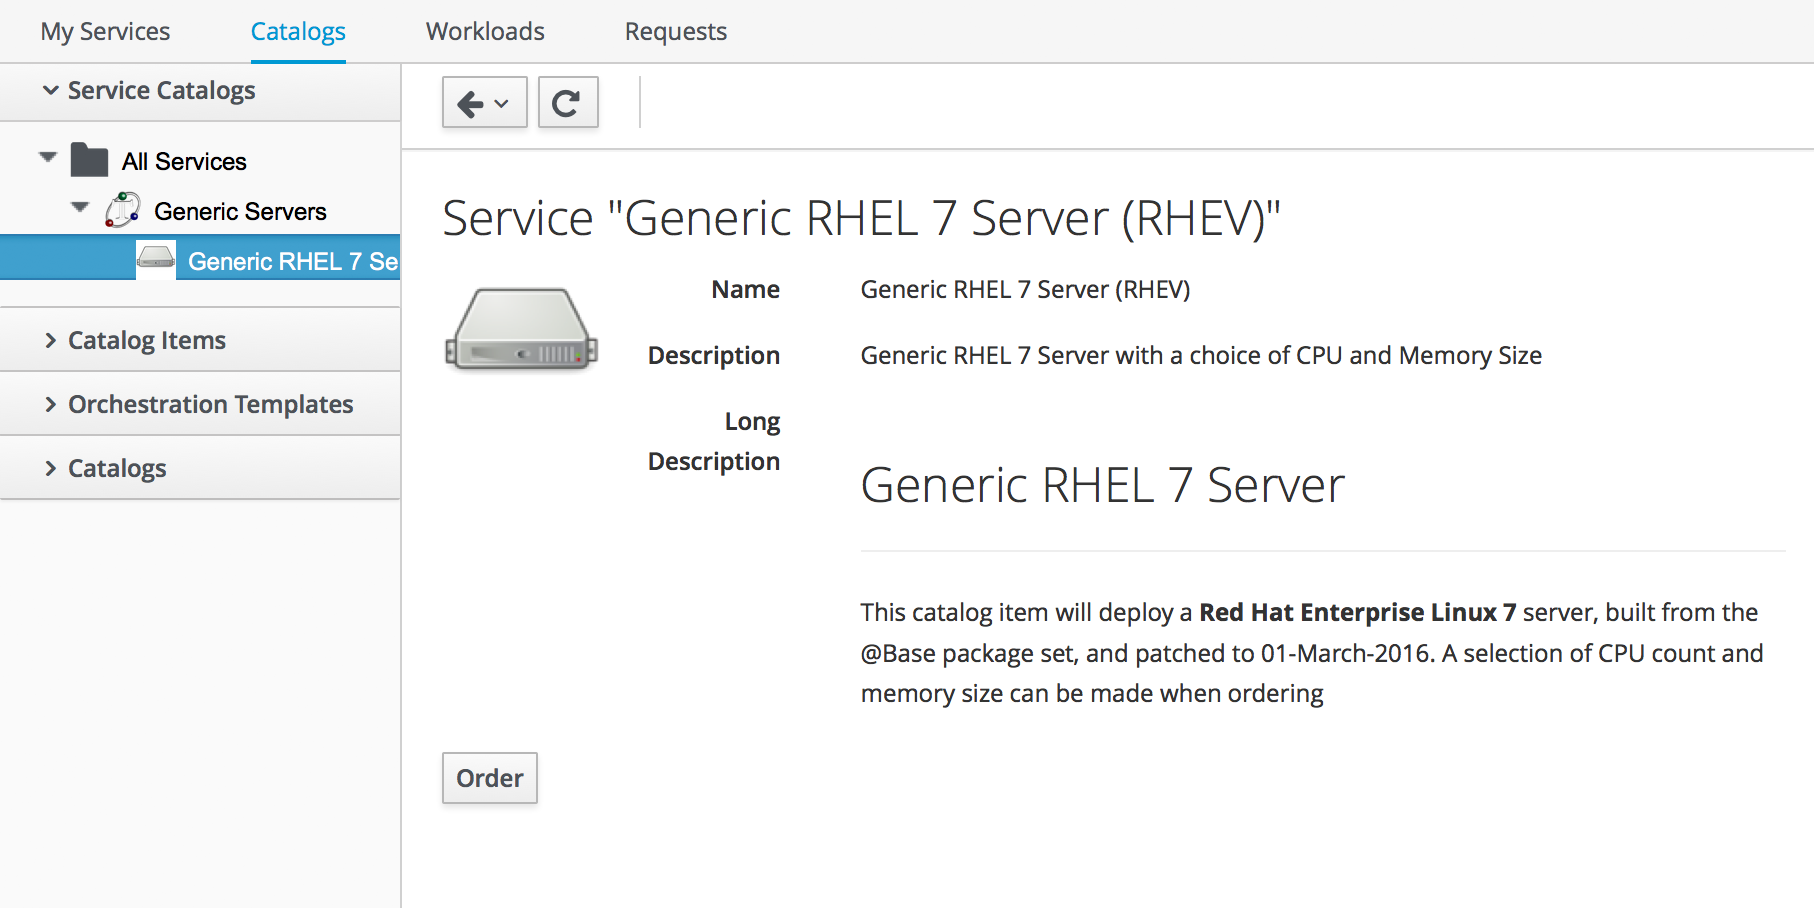
Figure 12. Navigating to the service catalog item
Click Order, and fill out the service dialog values (see Completing the service dialog).
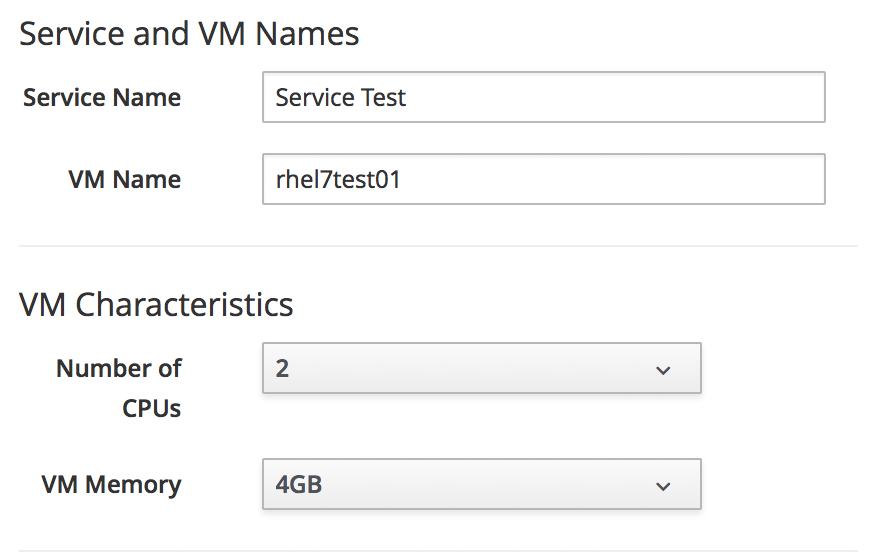
Figure 13. Completing the service dialog
Click Submit
After a new minutes, the new service should be visible in My Services, containing the new VM (see The finished service).
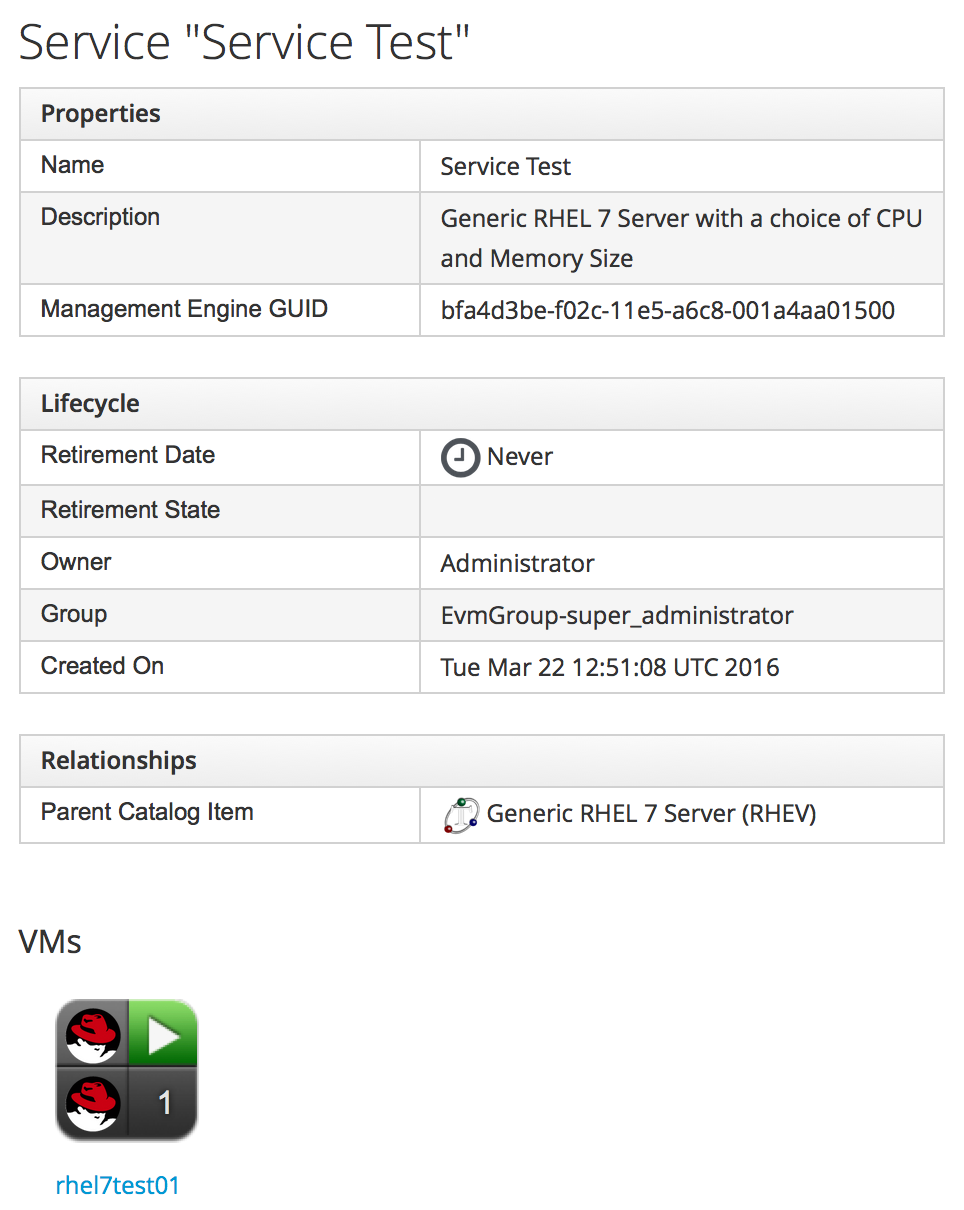
Figure 14. The finished service
If we examine the details of the VM, we see that it has been created with our requested CPU count and memory size (see Confirmation of VM configuration).
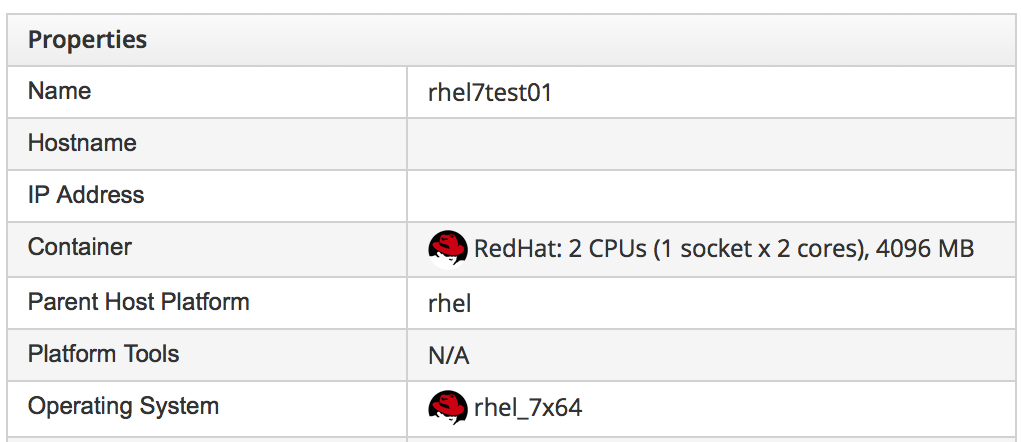
Figure 15. Confirmation of VM configuration
Summary
This example describes the procedure for creating a service catalog item to provision a single virtual machine. We can follow the same procedure to populate a service catalog with many types of virtual machine, both Windows and Linux. Although the service dialog used in this example was quite basic, it is typical of many generic services that we can create for our users. We can add further dialog elements, but we must be careful to balance the trade-off between simplicity of design and presenting additional choice to our users. Using dynamic elements can help in this regard. They enable us to create dialogs with "intelligent" elements that offer a reduced selection of choices, filtered by relevance for the requesting user. Rather than offering a drop-down list of all possible networks to provision the virtual machine onto for example, we might filter based on the requesting user’s group membership, or based on the input from another dialog element indicating that the VM should be tagged as Development.